
For this guide I will concentrate on creating a world from scratch. In the further readings section you will find more information on how to edit an existing world.
World Sizes
Worlds are mapped by chunks (i.e. tiles) of 256 x 256 pixels size. A tiny world consists of 1 chunk (hence the size of 256 x 256). A medium sized world consists of 4 x 4 chunks (1024 x 1024). Each of the standard sizes is 4 times bigger than the next smaller one.
These are the four standard sizes (size in pixels). The height map for these sizes are included in CAW.
- 2048 x 2048: biggest size (most EA worlds use this size)
- 1024 x 1024: medium size
- 512 x 512: small size
- 256 x 256: tiny size (mostly worlds for midnight sun challenges)
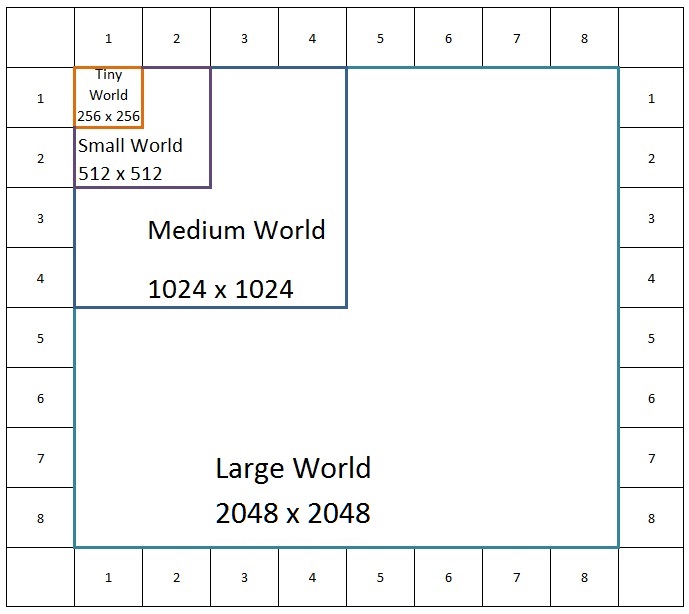
You can add custom sizes with the help of custom height maps (see below). The University world for example uses a size of 1536 x 1536.
Choose a map
To create your own world, choose File > New World (Ctrl+N). A new window will open:

- Choose a height map. Clicking on the button will open the folder with height maps for CAW.
- The different .png files are named according to map size and height factor. So for a large world choose anything that starts with “Large” in the name. For a small world use those that start with “Small” etc. The world sizes are explained in more detail here (tbd).
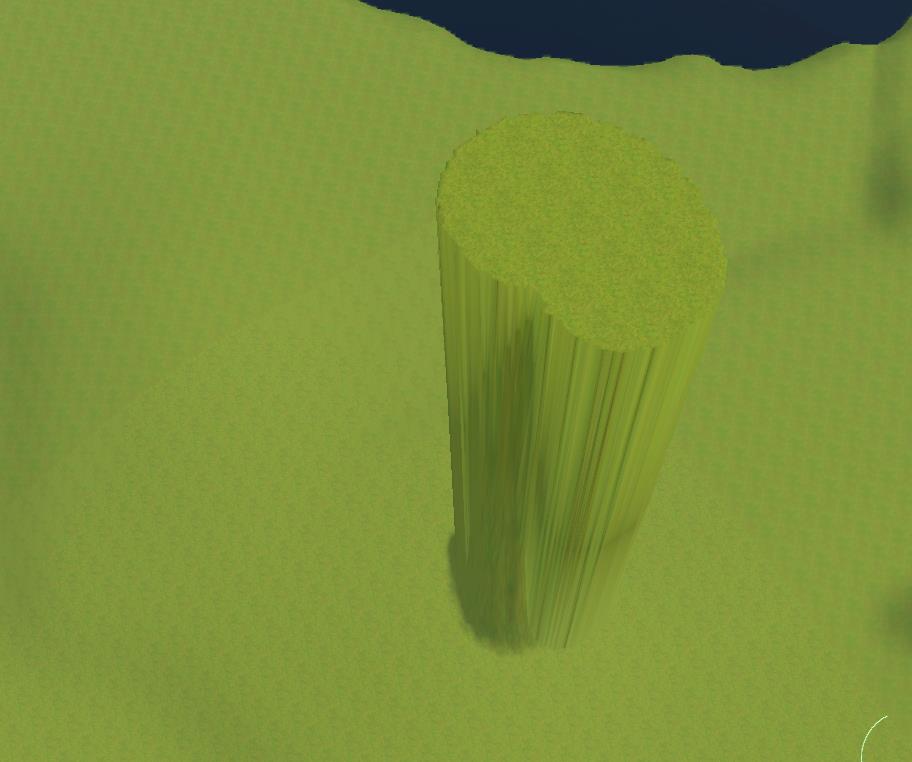
- The 3-digit number at the end of the filename is the world height. You can envisage your world as a box – your world’s size is length and width, and height is, well, height. Adjusting this height will impact the volume of the box and hence impact the performance of your world. The larger the height the higher can be your mountains or the deeper your sea. But if you don’t intend to have really high mountains a lower box would do. Height can be 100, 200 or 300. Set the value according to the number on the .png file you picked. Note: If you want to make a world with dive lots you should choose a world height of at least 200.
- Pick a base terrain. This will determine the base terrain texture and the initial set of terrain paints. Lush means, it will be the standard green grass texture as a base. Desert means, it will use the standard sand/dirt texture as base. Both choices will also set two sand textures and a rock texture. Mind, you can change all that later! I’ll detail that in the terrain painting chapter (tbd).
- Confirm with Ok when you made your choices.
I’m not sure if chosing a different height than 300 will have much impact on performance. After all, most of it will be empty. Unless you plan on filling all of your world box with objects….
This is how it looks like when you reached maximum height:
Custom Height Maps
Alternatively you can create your own height map. Mind, it needs to be a 16 bit greyscale .png file and always in multiples of 256 and square. Don’t flatten the image if you create it yourself and store it in the height map folder or anywhere else where you find it easily. It is NOT recommended to make them bigger than 2048 x 2048.
Then you can select your custom height map in the world creation process.
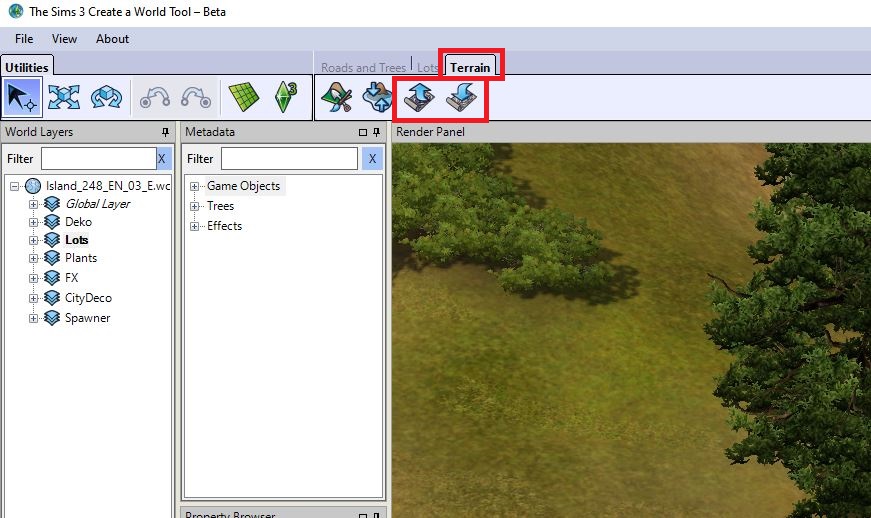
You can also import or export any heightmap at any time by using the buttons in the Terrain tools. But mind, if you have already worked on your terrain, those changes will be gone when you import another height map!
Also if you placed objects, those won’t be adjusted to any differences in height the new map will create. So only use this on an empty, fresh world.
This also allows to copy the heightmap of existing worlds into new worlds.
Global Layer
The Global Layer stores world information and is handled by CAW. You cannot add or remove objects directly. Information stored on the global layer are:
- Population: If you edit an EA world or a custom world that is populated, the households’ information are stored here. Again, you cannot edit this directly in CAW.
- Information about the state of objects that are not on lots (e.g. diving wells with destinations set to them)
- Information about docked houseboats (which are a special type of lot)
Also whenever you edit a lot in EIG objects will be put on the global layer. You can find the objects in the render panel but cannot move or delete them. They are usually hidden somewhere in the depths of your world. Apart from stability and memory issues this the main reason why it’s preferable to build in game and only place the built up lots in EIG. A “full” global layer can have several MB.
Backup your Global Layer
Backing up your Global Layer is very easy: use the initial global layer file from when you created your map in CAW. You can find it in the layers subfolder of your world. In this example, I created a world named “Simland”:
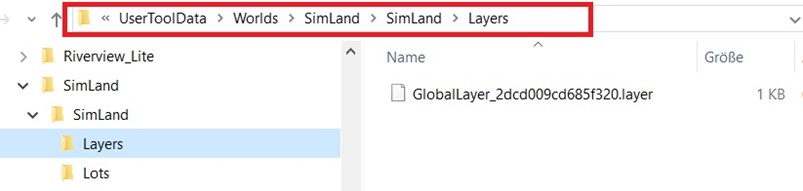
You can see the file named GlobalLayer, its size is initially 1 KB or sometimes 2 KB. Backup that file to someplace else so that you don’t lose it, in case you want to clean the global layer in a later state of your world. The file size will increase as you work on your world, so it’s best to make a backup right after you saved your world for the first time, when it’s still empty.
Cleaning the Global Layer
“Cleaning” here means emptying it. But as you cannot delete any objects on it directly in CAW you will have to replace the file in the Layers folder with the one you hopefully backed up from the very beginnings of your world.
In my experience worlds that don’t have a clean (i.e. empty) global layer run better and are accessible via NRAAS traveler. So if your world is not populated and you just cleaned the global layer, start EIG once more, and once it’s loaded, edit town, enter a lot (an empty one preferably to keep the number of created objects on the global layer small), go back to edit town, save and quit. This is just a working theory though and would require more testing.
So, why would you want to clean the Global Layer?
You may want to clean the global layer if
- there are thousands of objects on it because that might cause lag
- you want to get rid of the population of a world
DO NOT clean the layer in populated worlds if
- you want to keep the population!
- you have docked houseboats! If you do but still want or need to clean the GL, remove those lots first.
Set the Sea Level
Especially if you want dive lots you will need to make sure the water is deep enough. You can do this by either lowering the underwater terrain or by raising the water level (or both). You might need to also raise your above sea level terrain for that. Best to switch off the fog for this so that you can actually see a thing (under View > Fog). If you scroll to the very edge of the map you can see that your terrain is a 2D plane – you can look under it.
Use the Steep Valley Tool in the Sculpt Section of the Terrain Painting Tools with Strength and Falloff 100 and a large brush to lower the terrain as much as possible where it is supposed to be underwater:

This water level would be deep enough for nice shorelines and to allow sims to swim in the ocean or use boats. If you want to have dive lots, it will need to be deeper. For this, you’ll have to raise the sea level as such.
Click the Change Sea Level button under the Terrain Tools. Then click on your map where you want the new water level to be. You might need several tries until the water level is what you wanted. Mind, the button is a one-time button, so you will have to click it again if you want to try to set the water level again.

Also keep in mind this sets the global water level! You cannot add ponds above (or below) ocean water level this way.
Set Sunset and Sunrise
Where does the sun rise and set? Take this into account for the orientation of your world. You might not want to hide the lovely sunset behind mountains. The easiest way to do this is to place different large objects at the 4 corners of your world (to be able to identify directions easier, watch their shadows wandering) and then use the time tool (View > Time of the Day) to change the time. Zoom in to see where the sun hits the water (default 6 p.m.) or rises from it (default 6 a.m.)
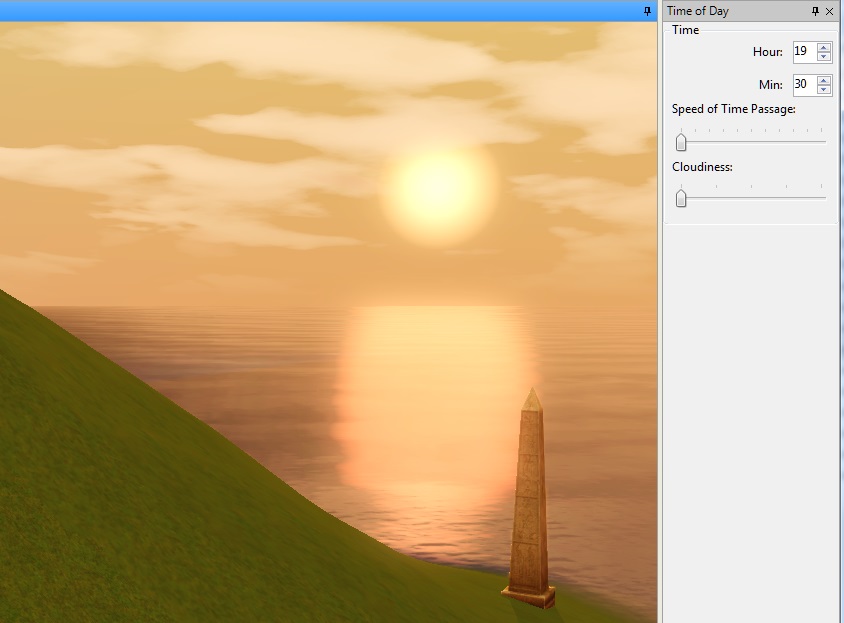
You can either set a time by entering numbers into hours [0-23] and minutes [0-59] or use the Speed of Time Passage slider to have the day pass in fast forward.
The Cloudiness slider allows you to circle through the 5 different weather profiles (Clear, Partially Clouded, Overcast, Stormy, Custom). You will see how light and cloudiness change for each weather profile. Weather will have its own chapter (tbd).
Now you’re ready to form and fill your world!