
When you open CAW for the first time, you will notice these different windows and areas. The one currently active is highlighted blue.

You can play with window sizes and locations by clicking on the little pins in each window. The windows can be resized, arranged differently, or stored as tabs which will open when you hover with your mouse over them.
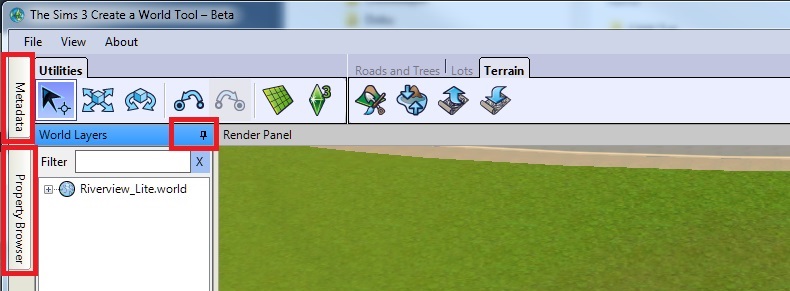
This might be helpful for smaller screens.
At the top of the application window the menu and the tool bar are located. I will explain menu and utilities a bit further down the page. The Tools will be explained in the Tools chapter.
The many windows

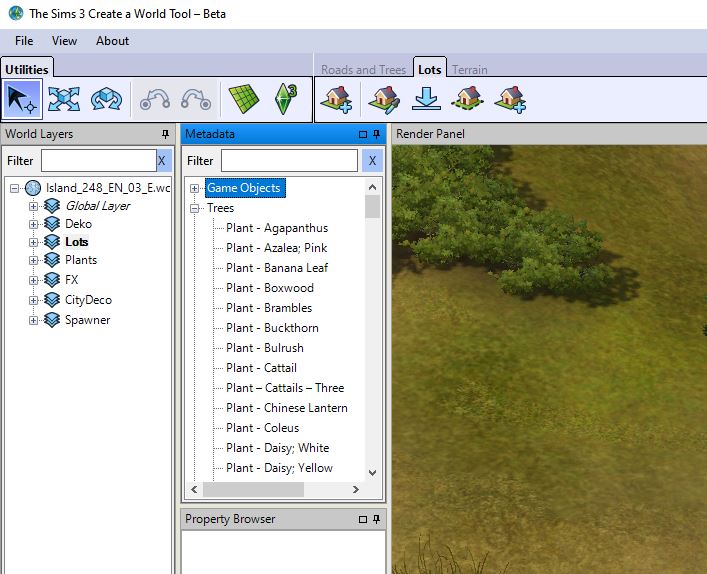
1. The World Layers Window
Layers work like containers and help you organising your lots and decorations. You can have as many or as few layers as you want, you can also add sub-layers to layers. Layers are purely organisational. As you can see in the picture above, I have one layer for lots, one layer for plants, one for decorations and so on.
You can name the layers whatever you like, as long as you avoid special characters and spaces. The world might not export otherwise. You can rename layers by clicking on them a second time while they are highlighted (similar to renaming files in Windows file explorer).
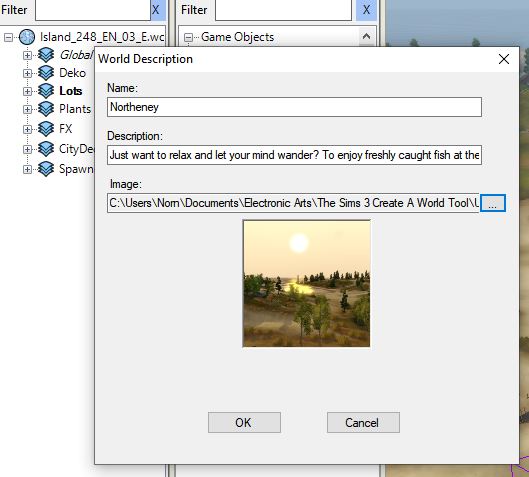
The layer at the top is the node. You cannot delete this one. It will have the name of world (when you opened it), don’t change that. Right-clicking will give you the option to Add Layer and also to Add/Edit Description. This otion will open the World Description window, which you will need once your world is ready for export.
The next layer is the Global Layer. It stores information about population, houseboats, off-lot tomb elements and other off-lot stuff. You cannot directly edit or delete this layer or its content. I’ll explain more about it here (tbd).
Other Layers
The layers you create are listed below the Global Layer. You can access the contex menu by right-clicking on a layer.
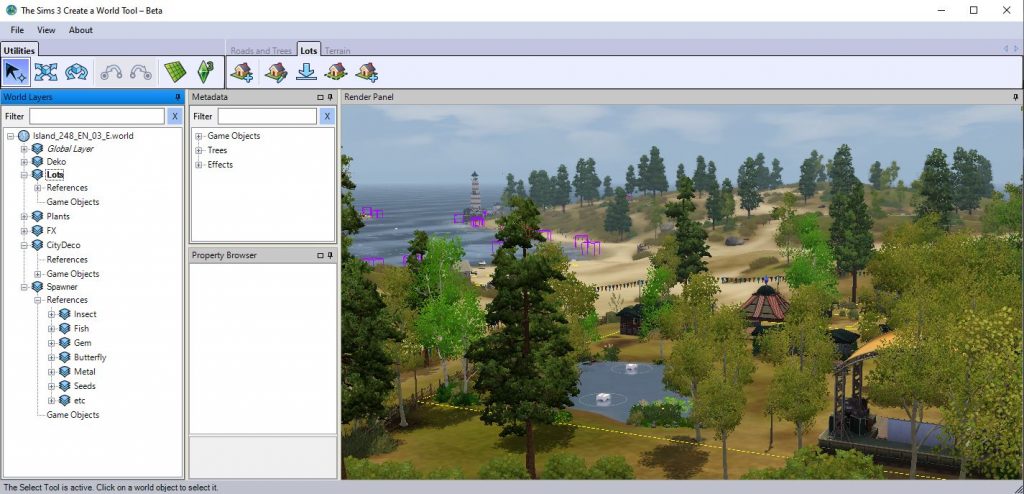
Objects or lots you place are always sorted into the active layer. Layers have two subsections: Lots will always be added to the References section, objects go into the Game Objects section. CAW will sort your content automatically into those sections.
The Layers context menu
You can open it by right-clicking on the layer. As you can see, the corresponding file name and path is displayed in the background.

Make Layer Active will make this layer active.
Add Layers will create a sublayer which will again have a References and a Game Objects section.
You can also Add a Lot directly from the context menu, even if it is not the active layer. This will activate the lot tool.
Delete… well, be careful with that. It cannot be undone! There will be a prompt to confirm deletion. The only way to restore those layers or lots is to quit without saving. If you have saved in the meantime, the only way to restore them is to go back a version. Another reason why “Save As” is my prefered method of saving.
- Delete All Objectmanagers will delete all sublayers including the lots and objects on them.
- Delete All Objects will delete all objects that are on this layer but not its sublayers.
- Delete will delete this layer.
The Lots context menu
You can open it by right-clicking on the lot. As you can see, the corresponding file name and path is displayed in the background. The context menu for lots has fewer options:
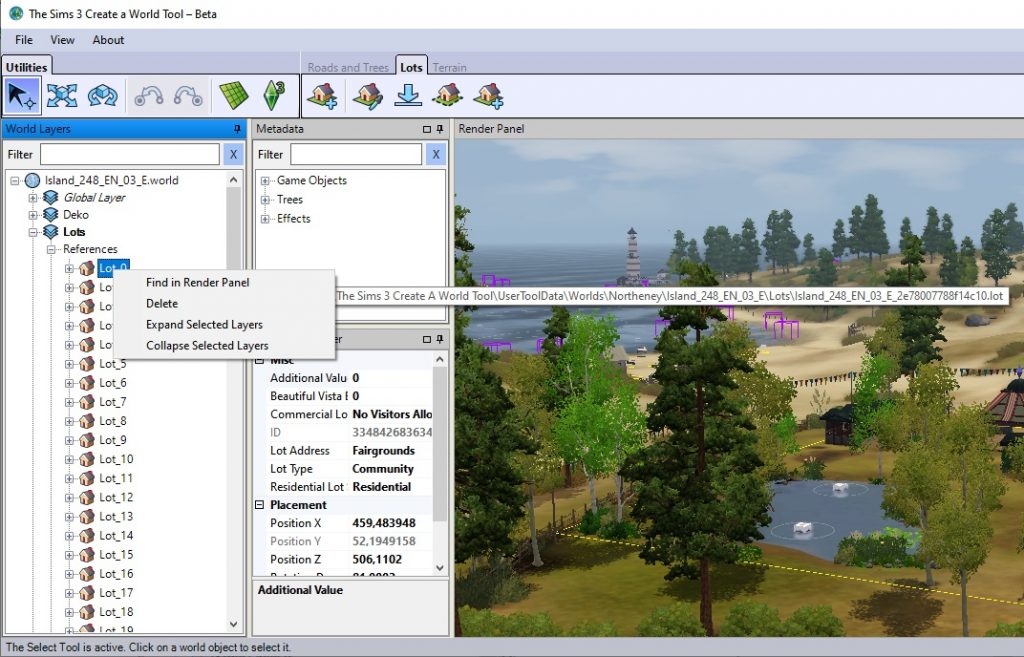
Find in Render Panel: one of the most useful commands. It will zoom the camera to the selected lot in the Render Panel window.
The other options are rather self-explanatory.
You can drag a lot to another layer in order to move it there.
The Objects context menu
You can open it by right-clicking on the object.
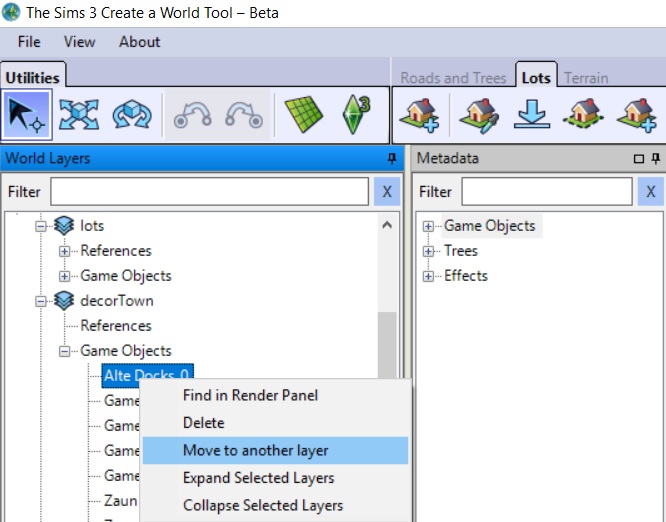
Find in Render Panel: one of the most useful commands. It will zoom the camera on this object in the Render Panel window.
Move to another layer: will move this object to another layer of your choice. Sadly you can only move one object at a time. You can also just drag an object to another layer in order to move it there.
The other options are rather self-explanatory.
Corresponding files on your computer
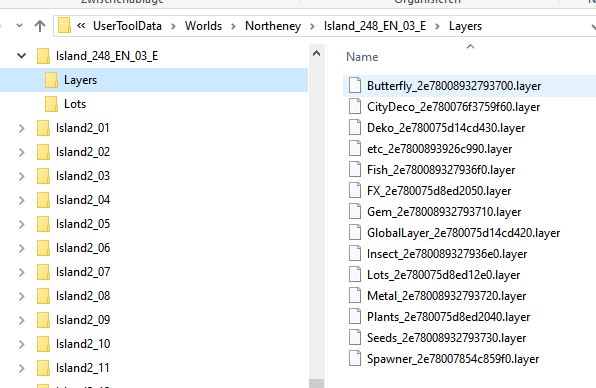
For each layer you create CAW creates an individual file. So don’t go overboard. I found it helpful for stability of the world if the layers don’t differ too much in size (check in your file explorer). Global layer and trees will usually be the biggest ones though.
Layer files you delete here will also delete that layer from your world. If you delete file for the Global Layer, your world won’t open anymore.
CAW will also create a raw lot file for each lot:
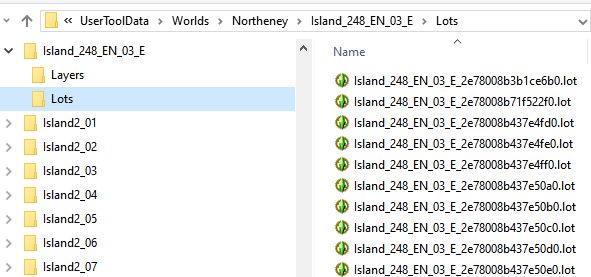
These are not ready-to-play lots though. But if a lot proved buggy, you can delete it here to remove it from the world.
2. Metadata Window
Here the content of the object and effect catalogues are displayed for you to pick and chose from. This includes CC and store content that is enabled for CAW. The name displayed is the object name, not the catalogue name so it might be a bit cryptic. It also may not be localised to your language, especially if it’s a CC object.
Store content often has rather cryptic hash names, depending on the way you installed it.
You select an object, plant or effect from the catalogue by double-clicking on it. It will then create an instance of this object at your mouse pointer and you can place it where you want by clicking. If the grid (see below) is toggled, objects will snap to it. Untoggle for free placement.
The selected object will remain active so that you can place more than one in a row without having to select it each time from the catalogue. Chose a different object or hit the escape key when you are done.
Mind, all things are stored in the layer that is active. So don’t forget to make the designated layer active if you want to keep things organised.
3. Render Panel
Now, this is where you can see what you are doing! It doesn’t need much explanation.
4. Search/Filter
World Layers and Metadata have each their own search field as they are searching in different locations on your computer. The search function in the Metadata window is rather buggy and likes to crash from time to time.
If this happens, don’t worry. CAW will continue to work, it’s only the search function that crashed. If you don’t need it, you can continue to work. Else save your work and quit CAW. It will be restored when loading CAW the next time.
Some tips:
– type slowly
– be patient, especially if you have a lot of additional content
– avoid special characters
– never use backspace, use the X button to the right to delete your search term
5. Property Browser
Here you will find specific information for the object or lot that you selected. For objects the exact postion will be displayed. Lots do have additional information displayed with can be changed for each lot.
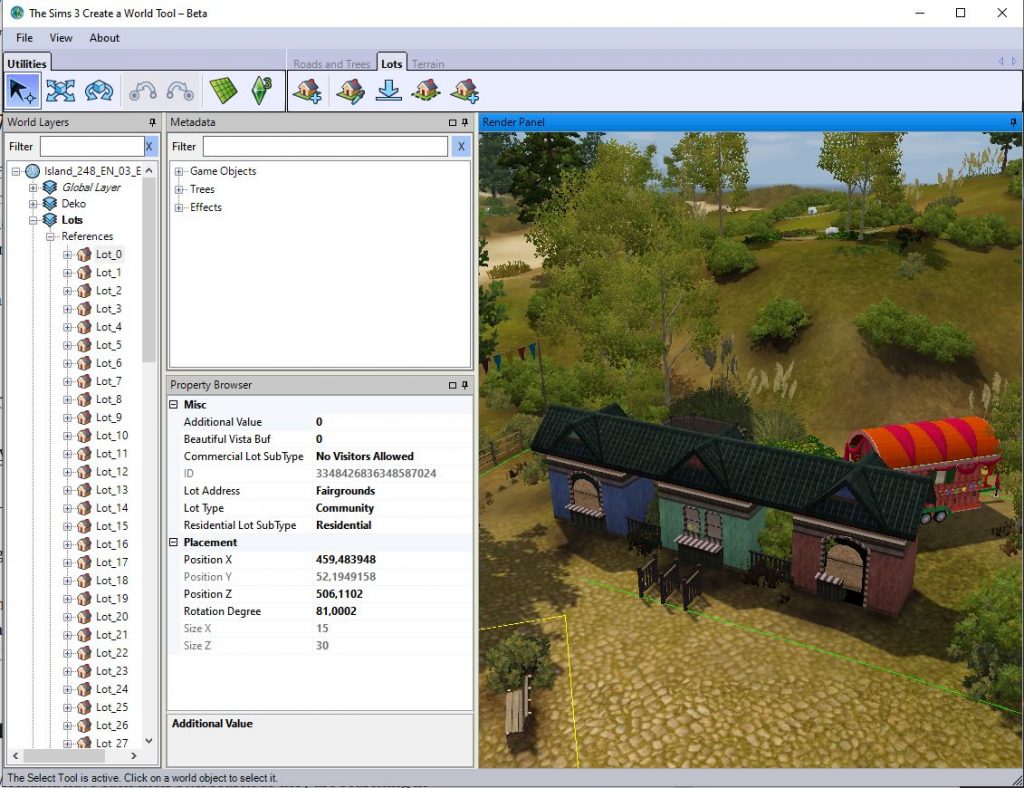
You can see that the selected lot is faintly marked grey in the World Layers window and that it’s boundaries are highlighted green in the Render Panel. I will cover the lot options in the Lots section.
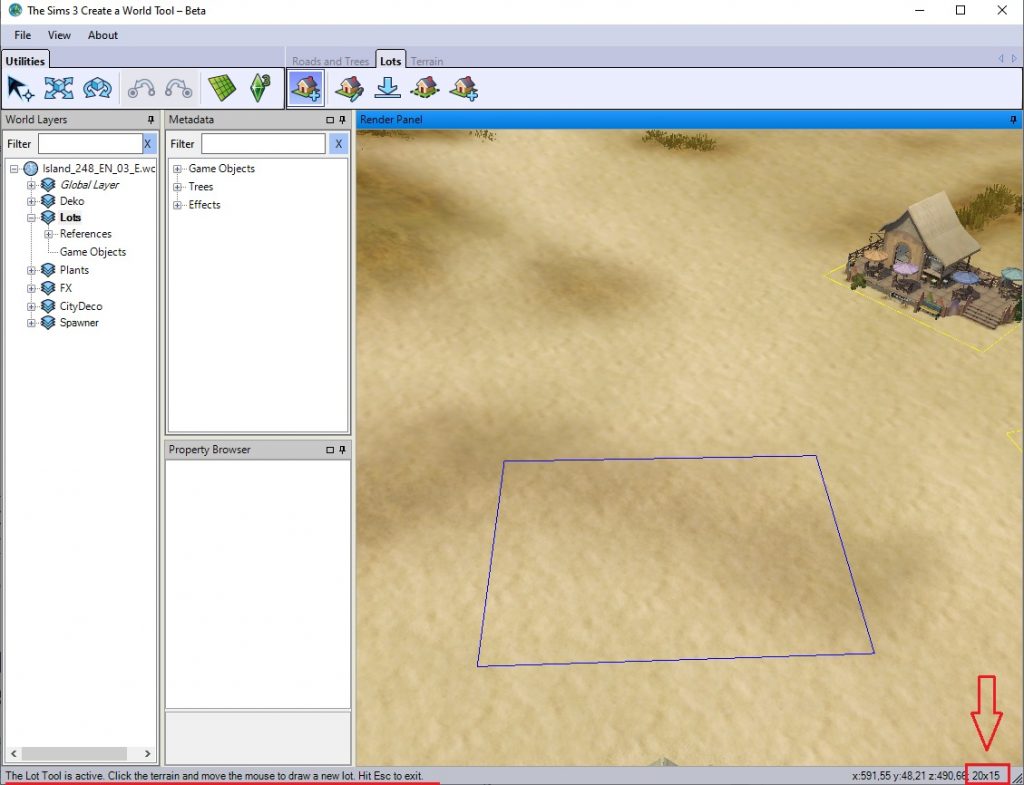
6. Status Bar
At the very bottom to the right you can find additional information about the active tool and its options. Also if you are drawing lots with the lot tool, it will display the exact location in your world and the lot size.
7. Resize Grip
Drag and draw that grid in this corner to resize the window freely if it is not maximized. You can actually do that at every corner.
The Menu
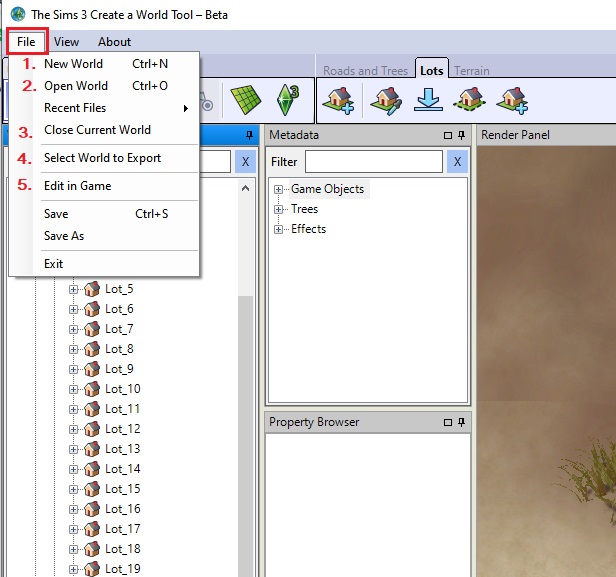
- New World: create a world from scratch
- Open World: open an existing world (CAW file format)
- Close Current World: closes current world. You will be prompted if you want to save the world. Some effects (lighting etc.) may visually carry over if you open a different world without quiting CAW first.
- Select World to Export: will export your world as Sims3pack to the Export folder in your user folder. This is the one in your regular The Sims 3 user folder, not any of the CAW folders! I will cover world export in its own chapter.
- Edit in Game: this will prompt a dialogue where you can confirm, if you really want to start the EIG mode. If you click “No”, it will return to CAW, else EIG will load in a new window. I would recommend to manually save before starting EIG, so you have a dedicated version to go back to. This is the same as the Edit in Game button in the Utilities tool bar.
Save and Save As
I always use and always recommend to use Save As. It does take a bit longer but it has the advantage to create a full backup version, plus you can name it as you wish. This way, you can backup important milestones. You can always delete saved versions you don’t need anymore to save disc space.
Save overwrites the same file over and over again. It does create a backup of the previous version, but handling those different processes at the same time is not a forte of the tool, so the results may be buggy.
View Menu
Setting any of these options will only affect your world in CAW. They have no effect on the exported world.
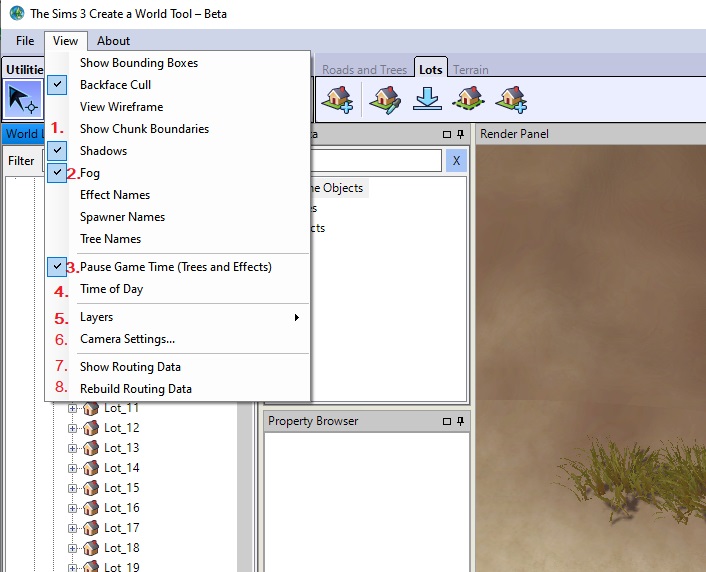
1. Show Chunk Boundaries: displays the chunk boundaries. Read more on chunks below.
2. Fog: enable or disable fog. This will remove the atmospheric fog that blurrs the view especially if you zoom out, which will improve visibility while you are working on your world. Colours look much more saturated if fog is unchecked.
3. Pause: this will pause trees and effects which may help with performance. Don’t forget to check this option again when you place effects, or you won’t see it!
4. Time of the Day: Opens a window where you can set Time of the Day, cloudiness and other things. I will cover the details in its own chapter.

5. Layers: This is not to be confused with the Layers in the World Layers window! These will hide or show the checked internal layers (not the ones you created). The most useful ones are Object and Flora which hide or show all objects or all plants placed in the world. This is helpful when checking for the routing grid.
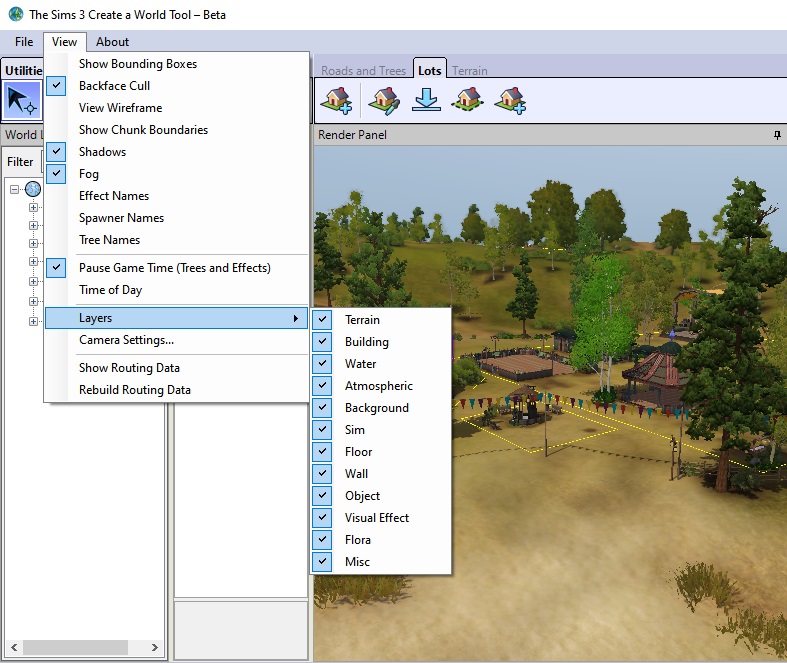
6. Camera Settings: opens a new dialogue window that allows to set the transition distance, similar to the setting in game. Usually the world is rendered per chunk the camera is focused on. Setting it low will help a lot with performance and stability. Setting those high will allow for better picture taking.

You can also invert horizontal and vertical camera rotation.
7. Show Routing Data: Toggles the routing grid. Essential to optimising routing in your world. There is a full chapter on this!
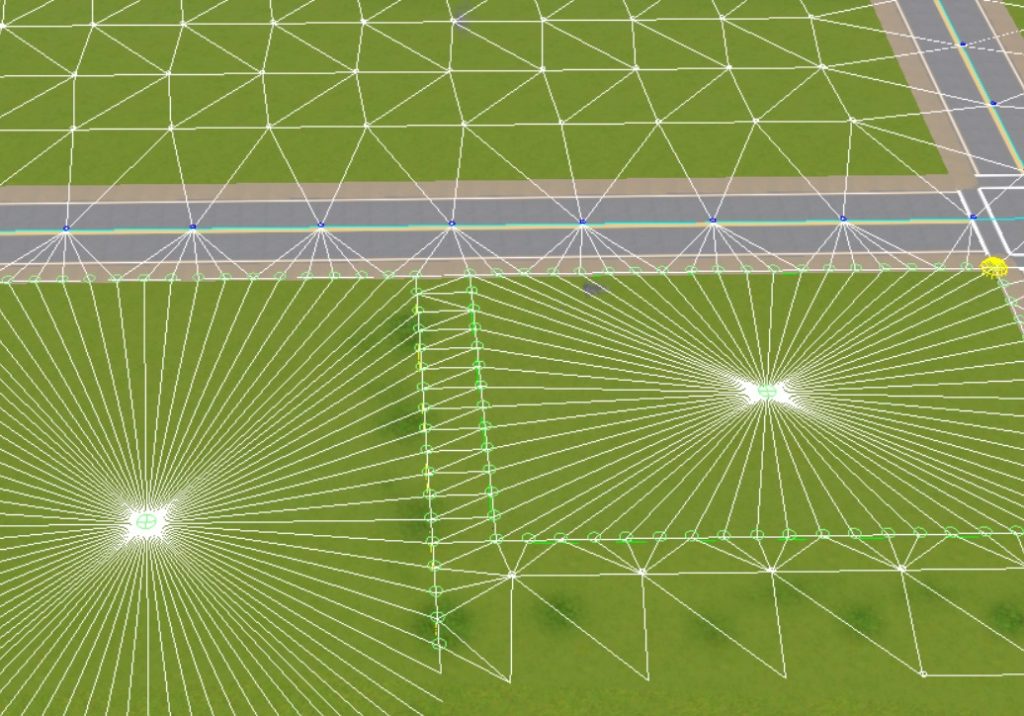
8. Rebuild Routing Data: this will trigger the recalculation of the routing grid.
Utilities
With these tools you select and handle objects, roads and lots. Note: once you select something by clicking on it in the render panel or by selecting it from an object list, it will remain active until you either select the next object or unselect it by hitting the escape key on your keyboard! So if in doubt, hit escape.
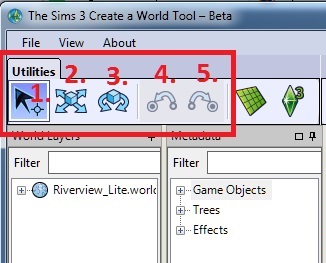
1. Select: selects an object or lot. Objects will display their boundary box when selected, lots will be highlighted green (residential lots) or blue (community lots). Hit escape to unselect, or use the utility to select something else.
2. Move: you can use the handles that show up on objects and lots (see below) for a more precise placement or just drag them around.
3. Rotate: not all objects can be rotated in all directions. Plants can only be rotated around the Y-axis, you cannot turn them on their heads. Roads and sidewalk parts cannot be rotated at all, but intersections can.
4. Undo: The undo button can be used for the latest 8 actions only, so don’t rely too heavily on it. You can also use Ctrl+Z to undo actions.
5. Repeat (i.e. undo undo)
Objects can be moved either freely or for more precision along the 3 axes lines provided by CAW:

If you activate the grid (see below) they will snap to it. The exact position is shown in the Property Browser.
You can also move the object around by changing the values in the Property Browser.
Chunks
Worlds are mapped by chunks (i.e. tiles) of 256 x 256 pixels size. You can activate the chunk boundaries from the view menu to actually see those chunk boundaries. They are displayed in light blue unless you used more than eight terrain textures per chunk (see below).

There are several reasons why chunks are important:
- The game clusters plants and trees by chunk and layer. This is one of the major factors for performance. Too many trees hit on performance, especially if they cannot be clustered by the game because they sit on different layers per chunk. I usually have all plants on one layer.
- The game renders the world by chunks. You see it very clearly in CAW, only the chunk the camera is focused at is sharp. Chunks further away are blurry. This holds true to a lesser extent in game: Light often stops at chunk borders. Terrain may be rendered a bit less crisp on the next chunk. Roads may glitch especially at chunk borders. So if you plan on lovely views, make sure things you want to focus on are on the same chunk.
- EA recommends to use 8 different terrain textures per chunk for performance reasons. The chunk boundary will turn red if you used more than that (see above). The base texture does count for this.
The Snap to Grid Mode
The Snap to Grid Mode button will toggle the placement grid. It looks a lot like the build grid in build/buy-mode in game. It actually is the same (apart from the color, also the same scale. One tile on the grid corresponds to one tile in game.
Use the grid when you place lots and roads. It helps to align lots properly to roads or to connect roads to intersections. Objects will snap to the grid, which is very helpful if you want to arrange decor objects in a precise way. For a more natural look, especially when placing plants and trees , untoggle the grid.
Also untoggle the grid if you need to move an object up and down. The grid will prevent that.

When the grid is toggled, the Snap To Grid window will appear at the bottom of the application window. The grid can be rotated by entering values between 0 (default) and 90 into the number box in that window.

Just keep in mind that terrain textures only have one orientation, they won’t rotate with the grid! You’ll notice this especially with tiled textures.
Switch the grid off after placing bridges to adjust their proper height. The grid will always push them back on the surface once you move them.
Camera Movement
Moving around with the camera can be a bit tedious, especially if you are working on a large world.
Using the mouse:
- Move forward/backward/left/right: right-click and drag your mouse
- Move up/down: Ctrl+right-click and drag your mouse up or down
- Zoom in/out: scrolling wheel
Using the keyboard:
- Move forward/backward/left/right: Up/Down/Left/Right arrows
- Move up/down: hit Q/F
- Tilt the camera angle: NumPad 8 or 2
- Zoom in/out: Num+/Num- or W/S
- Rotate: ,/. (comma/fullstop)
You can invert horizontal and vertical rotation under View > Camera Settings.